
Every time I build a new FPV drone, it’s like an adventure that begins with acquiring the parts and ends with a maiden flight. In this review, I will focus on how you can build a professional-looking 9-inch long-range drone on a budget using the iFlight Chimera9 ECO frame kit.
Usually, every DIY drone project should start with your needs and expectations from the project. Of course, these two factors should be correlated with the available budget. Building an FPV drone yourself is not necessarily cheaper than a ready-to-fly one. Furthermore, it can be even more expensive if you do not make the prospection correctly.
After setting the requirements and budget, you can look for the FPV frame that fits your needs. The rest of the parts (Flight controller, ESC, motors, radio, FPV system, and battery) must be chosen to integrate with the frame like a puzzle.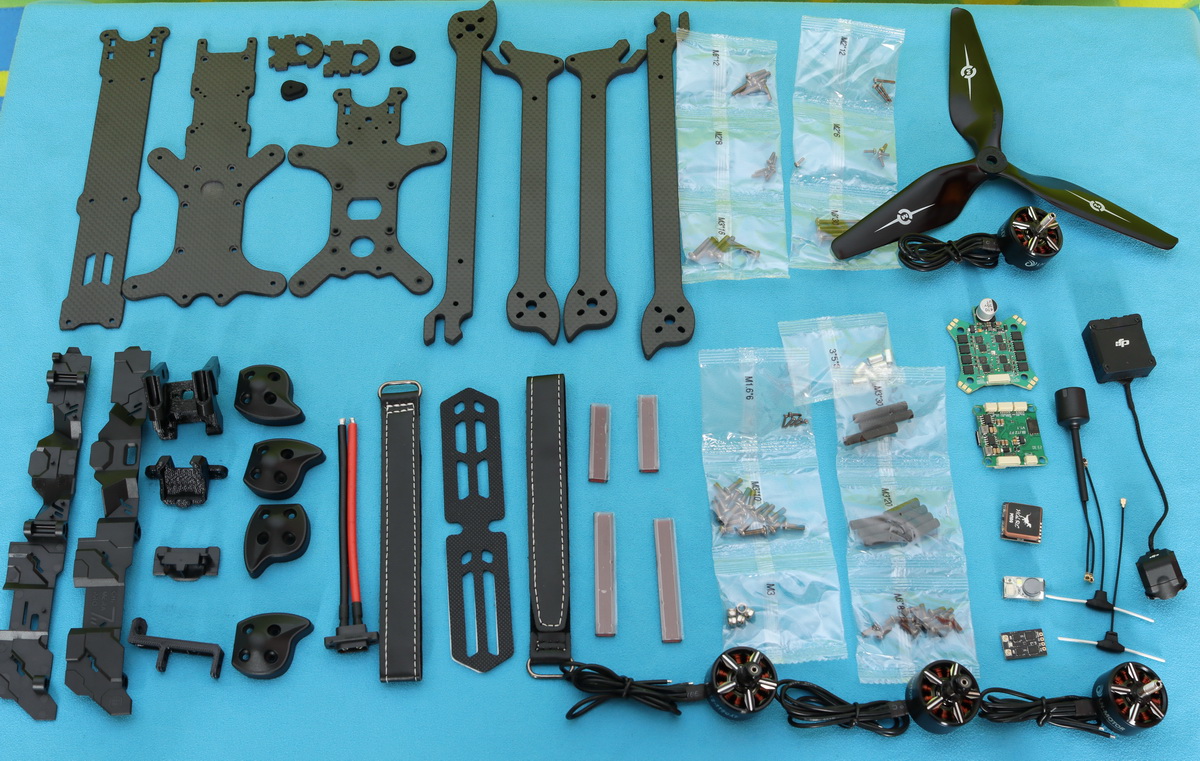
iFlight Chimera9 ECO review
Disclosure: I received this 9″ frame kit, FC, and ESC as part of a product review collaboration with iFlight. Although the parts were offered for free, all opinions in this article remain my own, and the sponsor in no way influenced me. The rest of the accessories shown in this review were purchased and paid by myself.
First, let’s discuss the budget for building this long-range FPV drone. The table below shows the required parts and the price you must pay. Of course, additionally, you will need compatible FPV goggles and a transmitter. Next, we will focus on each part, following the order in which you complete the puzzle.
| Part | Model | Price |
| Frame | Chimera9 ECO | $96.99 |
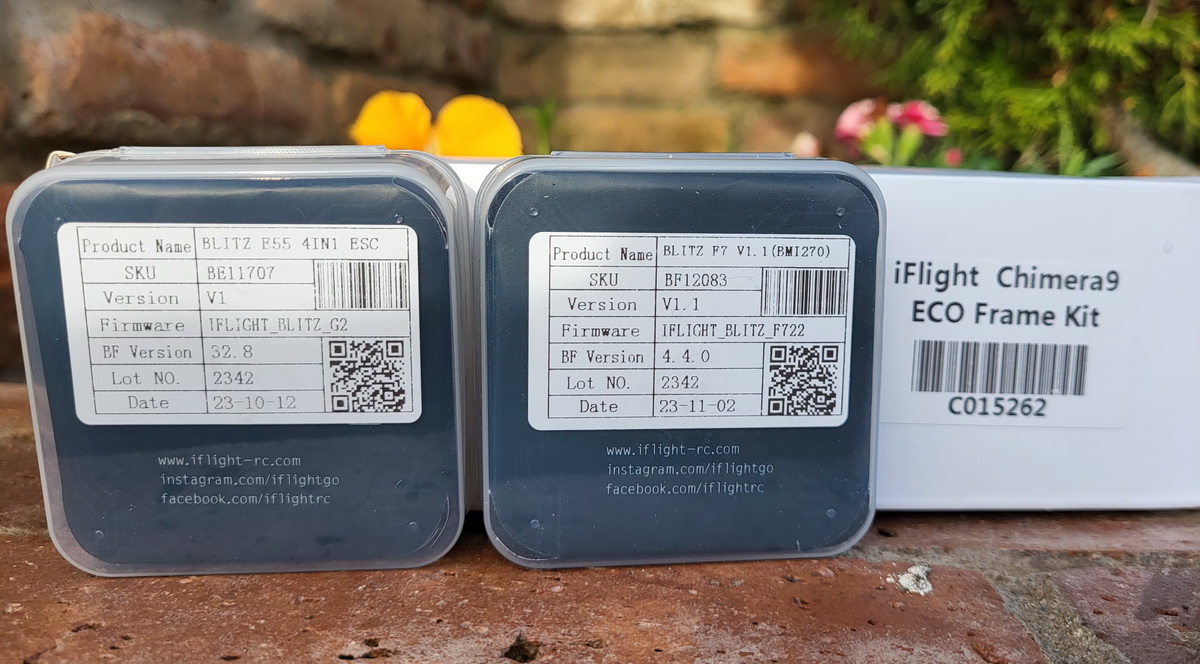
| Flight controller | BLITZ F7 V1.1 | $59.99 |
| ESC | BLITZ E55 4-IN-1 | $69.99 |
| Motors | 4 x LN-2812 1150KV | $112 |
| Propellers | 4 x Master Airscrew 3MR 9×4.5 | $35.88 |
| FPV system | O3 Air Unit | $229.00 |
| Radio receiver | SuperD ELRS 2.4G | $19.99 |
| GPS | M100-5883 | $16.99 |
| Buzzer | JHE42B | $3.00 |
| Battery | Fullsend 6S 6000mAh Li-Ion | $119.99 |
| Total cost | $763.82 |
iFlight Chimera9 ECO frame
The “ECO” world in the product could mean ecological/environmental or something economical/cost-effective. iFlight does not give any clue on this aspect.
Adopting “dead-cat” (DC) geometry is an excellent frame for those who mainly record with the FPV camera because there are no propellers in the view. The frame is designed to replace a broken arm/motor right on the field by losing a few screws. It can accommodate 30x30mm size flight stacks and 30.5*30.5/25*25/20*20mm VTXs.
Out of the box, it comes with a front GPS mount that makes it impossible to mount a GoPro camera. This issue can be solved by additionally purchasing or 3D printing a rear GPS mount and a front GoPro mount. The Chimera 9 can be equipped with two RX antennas (vertically and horizontally installed).

The frame kit comes in a relatively small cardboard box. It includes the following: carbon fiber parts, TPU mounts + protectors, a set of MR30 motor connectors, XT60 battery cable, two battery straps, protective side panels, and lots of screws+standoffs The screws are packed in separate bags by type, and a tiny label shows the size. No user manual is included, just an exploded view drawing that exemplifies how it should be assembled.
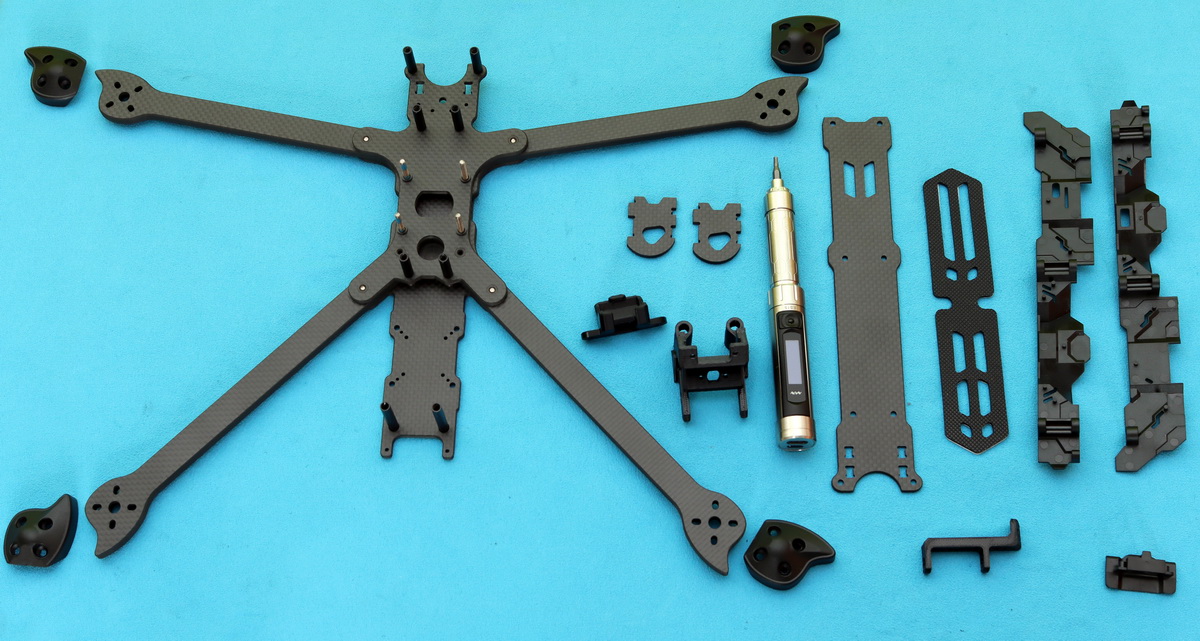
The frame comprises four arms, three plates (two bottom and one top), and two camera side panels. iFlight includes a pair of plastic side panels that make the result look clean and professional and protect the expensive electronics from dust, dirt, grass, and other debris. It has openings to access the FC’s USB port and the O3 Air Unit’s micro SD slot and Type-C port. A more “deluxe” version of the Chimera Pro V2 side panels also includes LED lights.
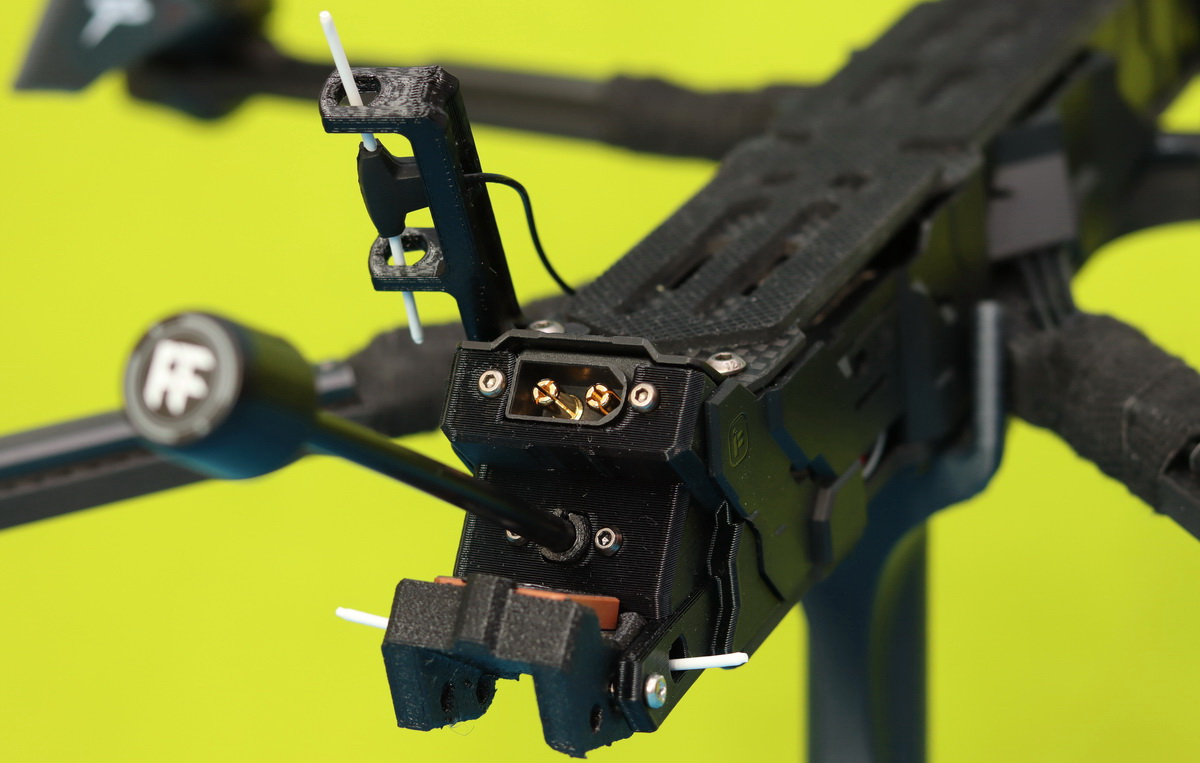
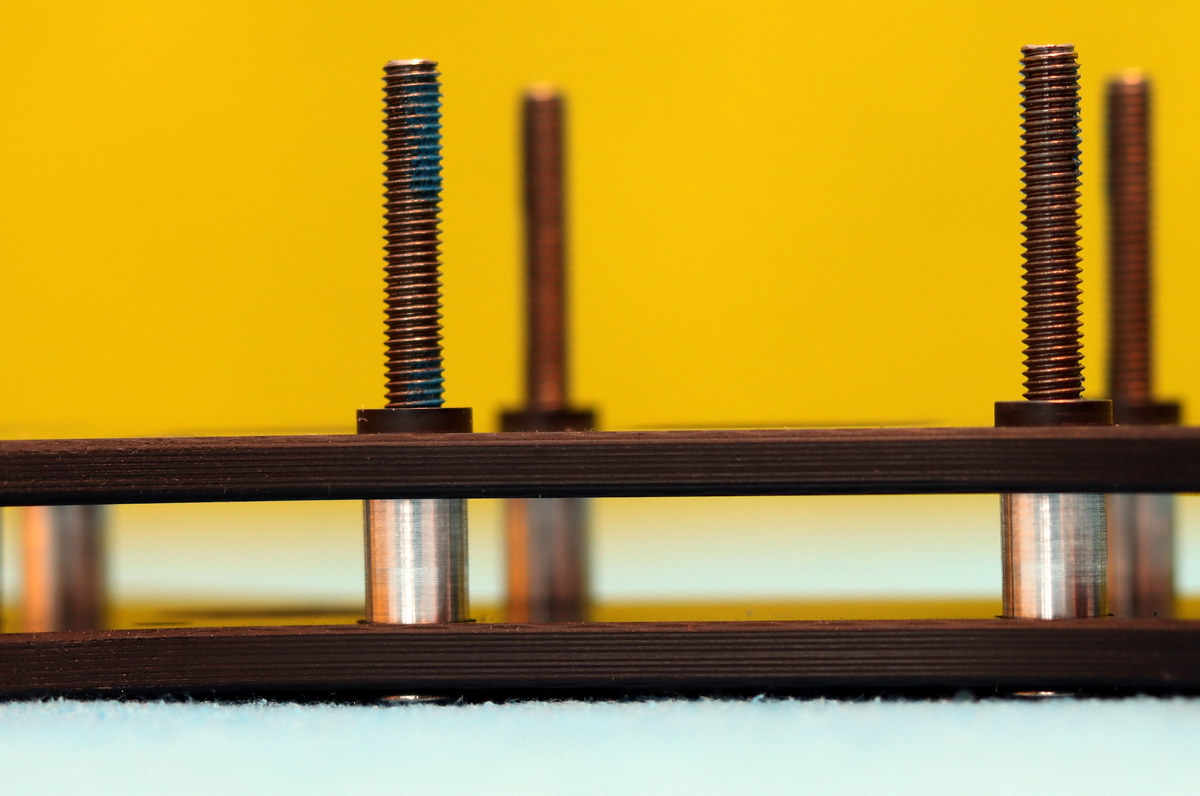
Assembling the frame can be done in less than one hour. First, install the four 6mm arms in a sandwich of two bottom plates and secure it with the four FC screws (M3x30). Next, add the eight standoffs and start installing the electronics. Lastly, install the 2 mm top plate and apply the battery anti-slip rubber padding.
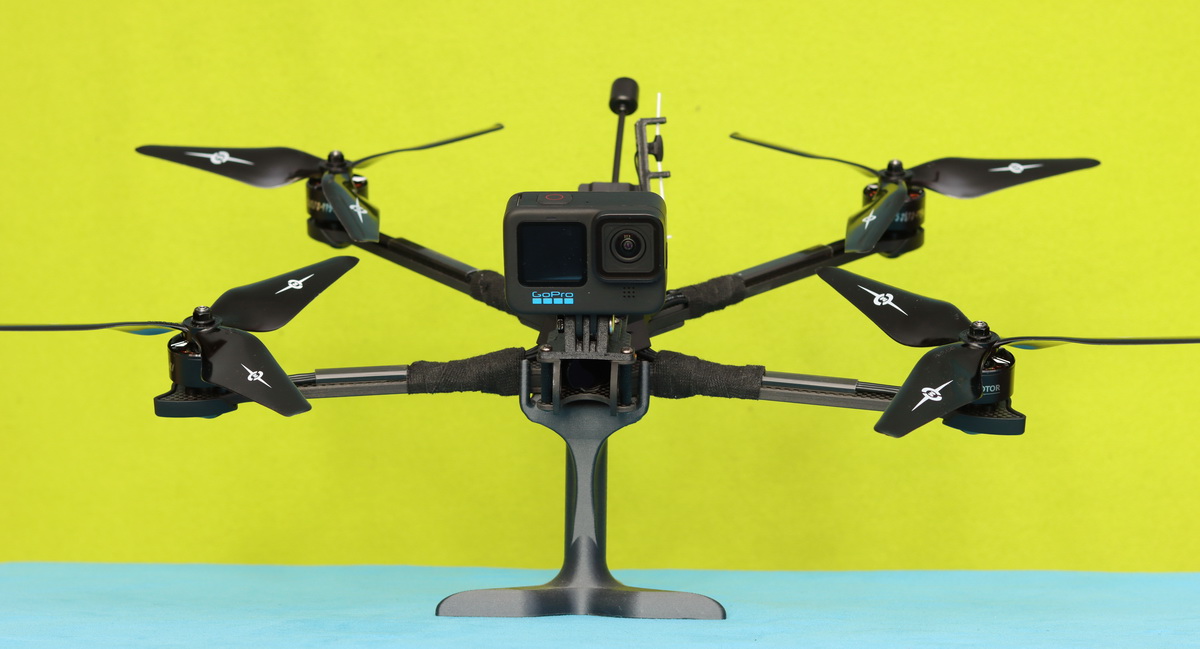
When fully assembled, the bare frame weighs around 370 grams, and with all electronics (except the battery), it weighs 800 grams. With a GoPro 12 on top and a giant Fullsend 6S 8000mAh Li-Ion battery, you can expect a take-off weight close to 2 kg.
iFlight Chimera 9 ECO technical parameters
| Geometry | DeadCat (DC) |
| Dimensions | 360*235*34 mm |
| Weight (without parts) | 377 grams |
| Wheelbase | 405mm |
| Propeller | 9-inch |
| Carbon fiber thickness | Arm: 6mm Bottom Plate: 3mm Top Plate: 2mm Upper Plate: 3mm |
| Flight stack mounting pattern | 30.5*30.5mm φ3mm |
| VTX mounting patterns | 30.5*30.5 φ3mm 25*25 φ1.6mm 20*20 φ2mm |
| Motor mounting | 16x16mm / 19*19mm φ3mm |
Where can you buy the Chimera9 ECO long-range drone frame?
You can purchase this frame from Flight’s worldwide official store with 15% off during the Christmas sale for $82.44 ($96.99). This frame and other iFlight products are also available on Aliexpress and other platforms.
IFlight Chimera9 ECO: Flight stack
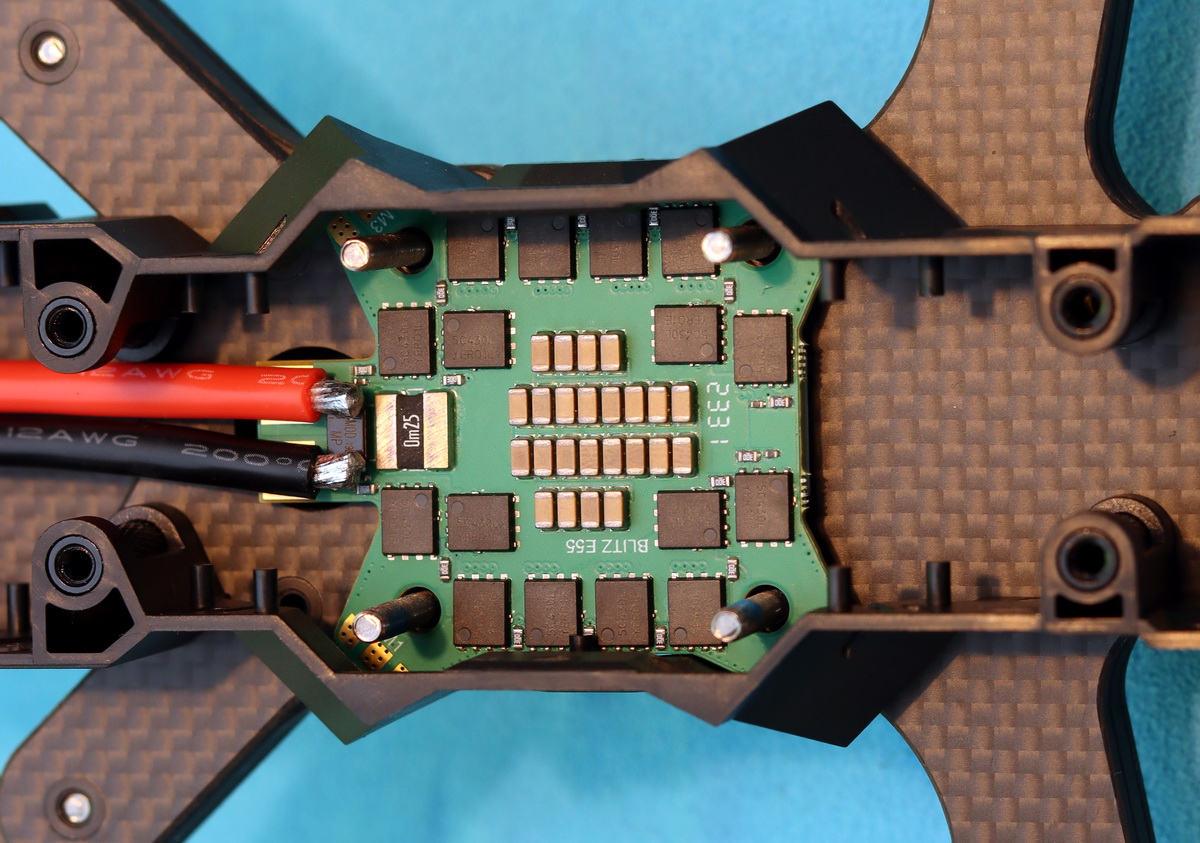
I opted for this build for the BLITZ F7 V1.1 flight controller and the BLITZ E55 4-IN-1 ESC. This tandem is also used in the original Chimera9 ECO. Initially, I considered the 55A ESC too weak for the powerful 2812 motors, but as it can handle peaks of 65A, I considered it fine, especially since I do not want to install heavy payloads on the drone. It is recommended to use this ESC because it has solder pads in the corners that fit perfectly inside the frame and side panels.
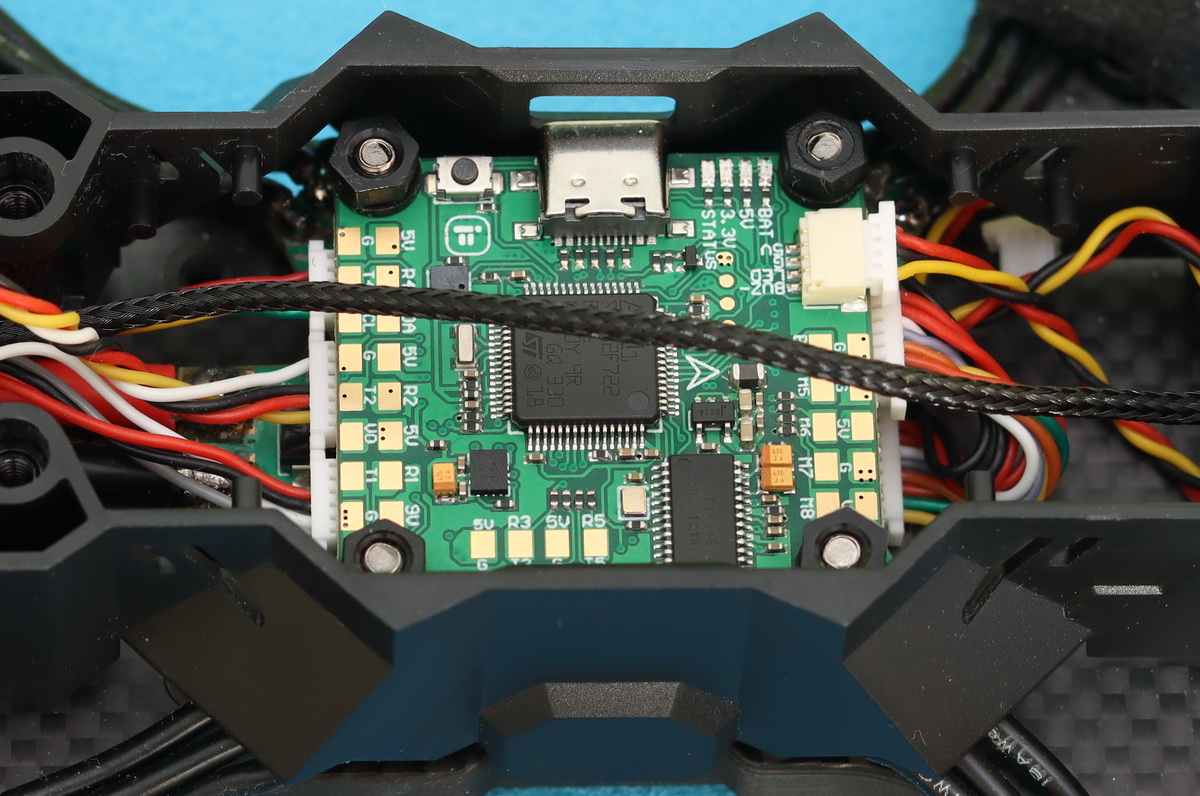
I love building FPV drones using flight controllers like the BLITZ F7 V1.1. My eyesight is not like when I was young, and I prefer to use connectors instead of soldering tiny tabs. As you can see in the photo below, I connected all peripherals (ESC, VTX, RX, GPS, and Buzzer) to the FC without any soldering. An arrow sign on top of the FC shows the orientation you need to install inside the iFlight Chimera9 ECO frame.
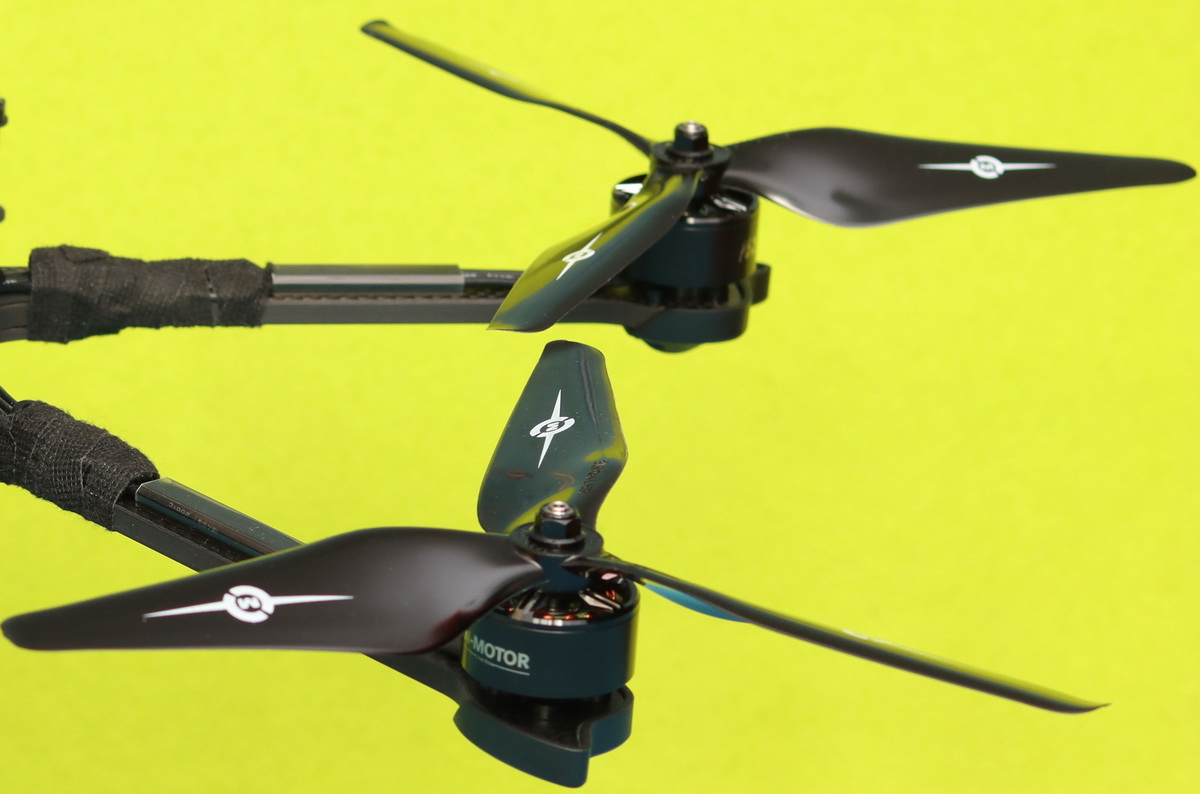
iFlight Chimera9 ECO: Propulsion system (motors and propellers)
iFlight’s original Chimera9 ECO is equipped XING-E 2809 800KV motors and HQ 9X4X3 propellers. My build came out more powerful due to the bigger FS2812 1150KV motors. The frame can accommodate motors with 16x16mm and 19x19mm mounting patterns. The included motor screws have the perfect length as takes into consideration the arm’s and TPU motor protector’s thickness.
You can solder the motors directly to the ESC or use the MR30 for easier replacement. Remember to route the motor wires through the shield tubes in both cases.
Finding 9″ propellers is not easy, and are also much pricier than commonly used 5″ ones. If you can find a set of 5″ for $2, you need to pay $8 at least for a single 9″ prop. For this project, I used factory-balanced 3MR 9×4.5 blades from Master Airscrew, a reputable US brand.
Experts consider that 900KV is a much better option for such builds than 1150KV, especially if you use 6S LIPOs and wish for cinematic flight performance.
Before installing the propellers on the motors, remember to test the motor layout (order) and rotation direction; if anything needs to be changed, you can do this from the BetaFlight Configurator under the “Motor” tab.
iFlight Chimera9 ECO: FPV system (VTX and Camera)
The factory-made Chimera9 comes with an onboard analog FPV system that, in my opinion, is far behind the impressive experience of digital platforms. I used a leftover unused DJI O3 Air Unit that provides onboard 4K recording, outstanding FPV quality, and up to 10KM range. The cable between the camera and the VTX is about 10cm, which proved to be short for the length of the frame, and I had to order a 15cm one. To reduce the jello effect, the camera mount uses two silicon insertions.
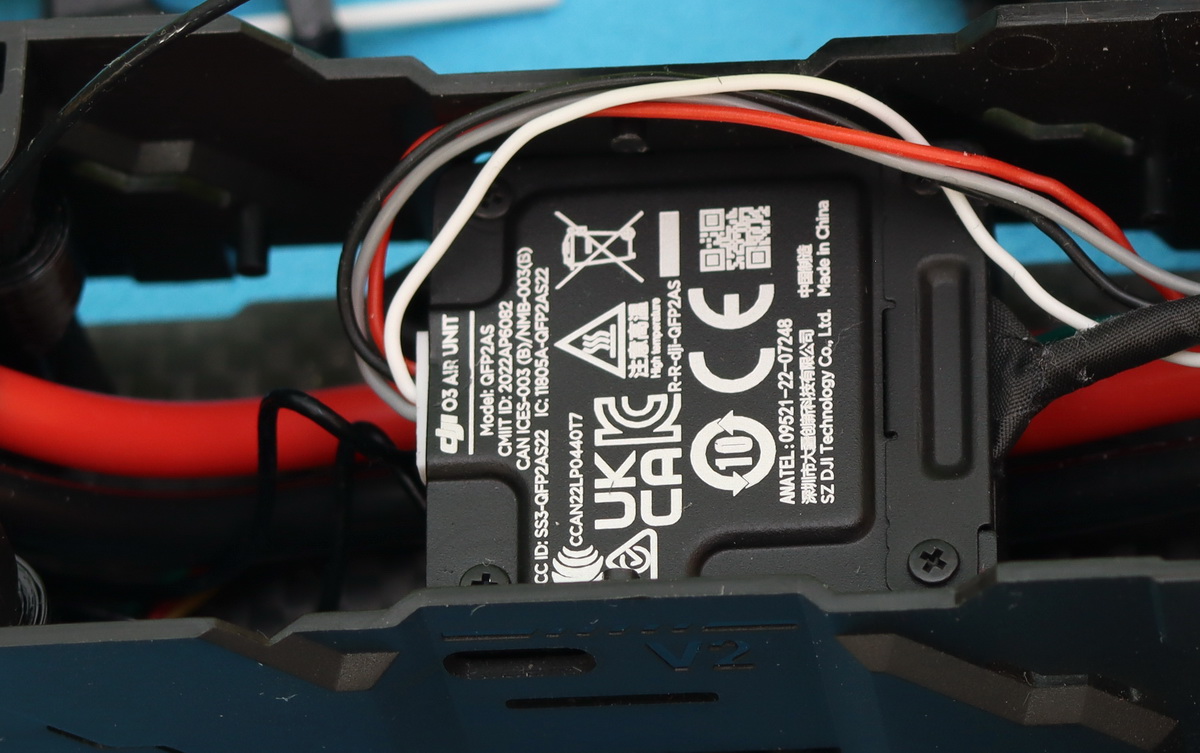
As mentioned, the protective side panel has two tiny windows for the O3’s Type-C port and micro SD slot. You must use 1cm standoffs under VTX to set the right height.
Best radio system for iFlight Chimera 9 ECO long-range FPV drone
TBS Crossfire was considered the best radio transmission system for long-range FPV drones for many years. In the last two years, ExpressLRS became a much more accessible budget alternative to CRSF. Since the release of the “Gemini” feature, ELRS gained even more popularity. The BetaFPV SuperD RX and SuperG Nano TX allow simultaneous transmission over two antennas to obtain more reliable communication than probably ever before.
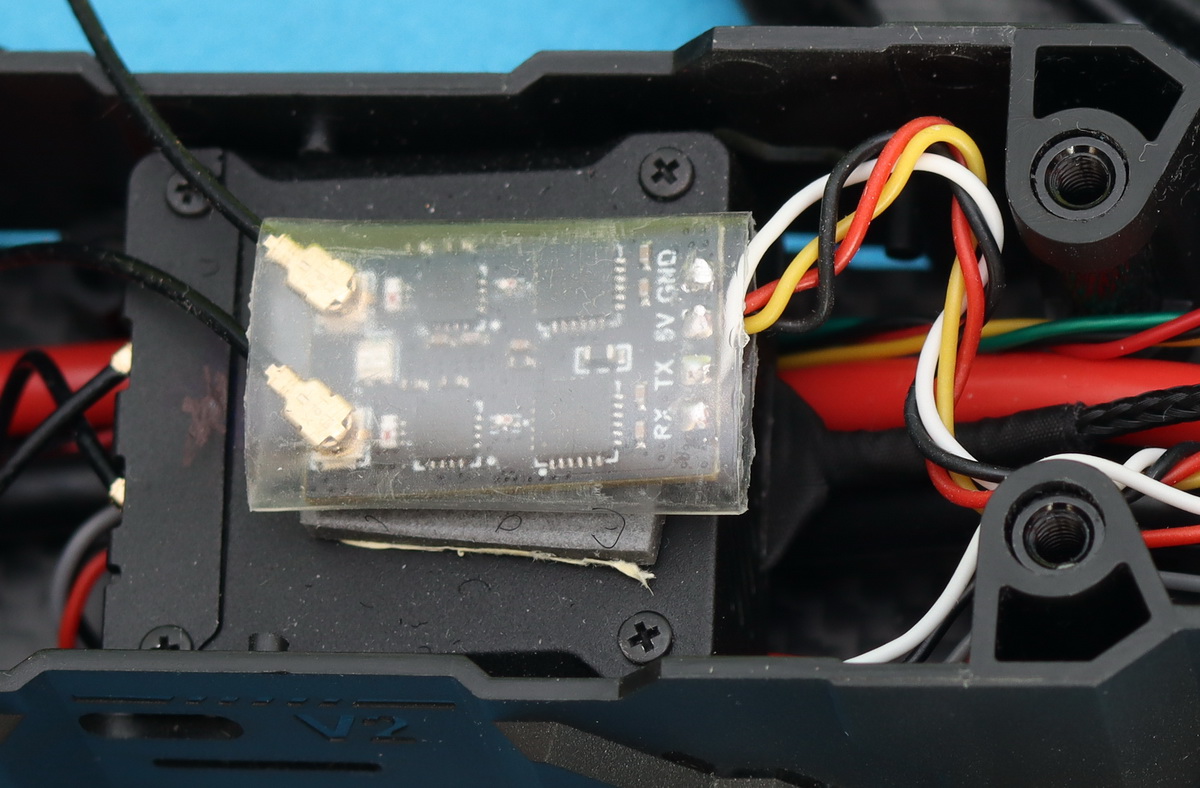
I installed the ELRS RX module on top of the O3 VTX, but there is plenty of room inside the frame of other spots. I mounted one antenna vertically and the second one horizontally; this should give a better range.
Other parts needed to complete the iFlight Chimera9 ECO frame
In addition to the primary parts listed above, I used a GPS module and a self-powered buzzer for safety. These two tiny parts are essential when you fly over long distances. The GPS module gives you the aircraft’s exact position and allows a fail-safe return to home (RTH) when radio communication with the pilot is lost. Remember that this feature requires BetaFlight 4.3 or newer firmware.
If you crash it somewhere in the wild, a self-powered buzzer is also necessary to recover your LR FPV drone. It gives you audio and visual signals that indicate the drone’s position, even if the main battery was disconnected during the collision with the ground.
In the table below, I compared the parts used in the original Chimera9 ECO and the one I built.
| Chimera9 ECO | Original parts | Parts used for this build |
| Flight controller | BLITZ ATF435 | BLITZ F7 V1.1 |
| ESC | BLITZ E55S 4-IN-1 55A | BLITZ E55S 4-IN-1 55A |
| Motors | XING-E 2809 800KV | LN-motor FS2812 |
| Propellers | HQ 9X4X3 | Master Airscrew 3MR 9×4.5 |
| VTX | BLITZ Whoop 1.2G 1.6W BLITZ Whoop 5.8G 1.6W BLITZ Whoop 5.8G 2.5W |
DJI O3 Air Unit |
| Camera | N/A | DJI O3 |
| Radio receiver | TBS Crossfire Nano RX iFlight ELRS 868/915MHz RX iFlight ELRS 2.4GHz RX |
BetaFPV SuperD ELRS 2.4G |
| GPS | iFlight BLITZ M10 | HGLRC M100-5883 GPS |
| Battery | Fullsend 6S 8000mAh Li-Ion | CNHL 6S 3300mAh LIPO |
| Buzzer | N/A | JHE42B |
Recommended battery for iFlight Chimera 9 ECO
On top of the Chimera 9 ECO, there is plenty of room for high-capacity batteries. You can use LIPO and LI-ION packs as well. It can accommodate batteries up to 14cm long using two straps to secure it to the frame.
I suggest using packs with at least a 30C discharge rate. iFlight recommends using their Fullsend 6S 8000mAh Li-Ion pack, but other models will also fit. For the initial tests, I used a CNHL 4S 1800 LIPO battery, and later, I moved to a 6s 4000mAh pack that provided an average flight time of 22 minutes.
iFlight Chimera9 ECO: Alternatives
If you want to build a 9-inch long-range FPV drone, your options are limited, especially if you prefer the dead cat geometry with a clean FPV view. Priced for only $30, the MARK4 V2 9″ (387mm wheelbase) is the cheapest 3K carbon fiber frame. If you are on a tight budget, the DarwinFPV X9 frame costs only $59.99. With 8mm thick arms, the AMAX F9L+DC is a truly robust frame.
The advantage of the Chimera 9 ECO over the other 9″ FPV frames is the cleaner look, thanks to the two side panels.
Final words
My adventure ends here, and I hope to start a new build next year, maybe even a larger 10-inch one :)
Building the iFlight Chimera 9 ECO was fun. I did not encounter any issues except the short O3 cable. The box included not just the carbon fiber parts but also the TPU parts and the two side panels. For under 100 bucks, it is probably the most complete kit.
The iFlight Chimera 9 ECO is a powerful and heavy flying machine, and if you are starting with this hobby, please seriously consider building a smaller 3-5″ FPV drone. In my first real-life flight through FPV goggles, I got disorientated and scared, lost control of the drone, and crashed it over my wife’s car. Luckily, it was a 75mm TinyWhhoop and nothing terrible happened.
Depending on your chosen motors, you can expect a payload capacity of 1.8-2.3kg. It can carry a Blackmagic 6k cinema camera for professional work.
Merry Christmas and Happy New Year 2024!
iFlight makes such good FPV frames. Love my Chimera 7 and 9.
Thanks!
The Chimera9 is a cheap alternative to the iFlight Helion 10.
do you have vibration problem with camera?
Yes, the vibration is very high, maybe the new 4.4.2 could fix the issue. I will try this weekend!
You should test it with BetaFlight 4.5!!!
Hi!
I currently own the Chimera 7, but I’m having trouble landing it in AIR mode because I’m not skilled enough, especially since I’ve been flying with DJI FPV for the past 2 years. Even though I confidently flew in AIR mode (M mode), I always landed in “N” or “S” mode, especially because I often flew in mountainous areas with snow and/or mud, catching the drone mid-air.
Now, I need a long-range drone, so I got the Chimera 7, but, like I mentioned, I’m struggling to land in AIR mode.
So, I’m reaching out for your advice or recommendations.
I am inquiring if you have information about an FPV long-range drone that offers flight modes similar to “N” and “S” modes, alongside the “AIR” mode, of course.
I’d really appreciate your help!
Respectfully,
Dario
For 9-10″ drones I would recommend 8S batteries, they have better efficiency!
wow! it looks great! please can you send me the Gopro mount’s STL file.
Than you and I wish you Happy New Year!
Beautiful build! What is the flight range?