

The Kidoodle MiniBox A1 is a 3D printer designed for younger children. It features a chilled-safe enclosed frame with minimal exposed parts and can be controlled remotely via a tablet or smartphone. It comes with pre-loaded model files and access to a cloud library to print toys, doll house furniture, numbers, and many other cool things out of the box. And most importantly, it uses environmentally friendly and non-toxic printing materials.
Besides the fun of making toys, learning to use 3D printers offers numerous benefits for kids. It fosters a range of skills and provides valuable educational experiences. From a young age, they can bring their ideas to life, from conceptualization to creation, encouraging them to think outside the box. The design and assembly of 3D-printed models introduce basic engineering principles and help understand modern manufacturing technologies.
Working on 3D-printing school projects often involves collaboration and teaching children to work effectively in teams. Students can create their models and share them with friends. If their design interests schoolmates, they learn about the potential for creating and selling 3D-printed products and introduce basic business concepts.
Kidoodle MiniBox A1 Kids 3D Printer review
Disclosure: I received this box 3D printer for a product review collaboration with Kidoodle3D. Product specs and quality may vary according to the manufacturer’s reliability, so I cannot guarantee that you will get products that perform the same as in my article.
Behind the Kidoodle brand lies Guangdong Dale Technology Co, a pioneering enterprise focused on children’s innovative education. Upholding the educational philosophy of “Inspiring Creativity, Cultivating Thinking,” we are dedicated to providing cutting-edge 3D printing technology for children aged 6-14, sparking their creativity and imagination.
The 3D printer was sent from China instead of a European warehouse, and I had some issues with customs clearance, especially since they mistakenly sent two packages. I received a white version, but orange, blue, and black are also available.

Kidoodle A1 3D printer: Unboxing
The MiniBox A1 comes well-packed with protective foam inside and outside. The box includes the following accessories: 24V AC/DC power adapter, spare PEI sheet, 250g test filament, platform glue, Hex Wrench kit, tweezer, and USB flash drive. The whistle-like micro USB includes a product manual, how-to videos, a slicer program, and demo g-code files (if you lose it, the content can be downloaded from here).
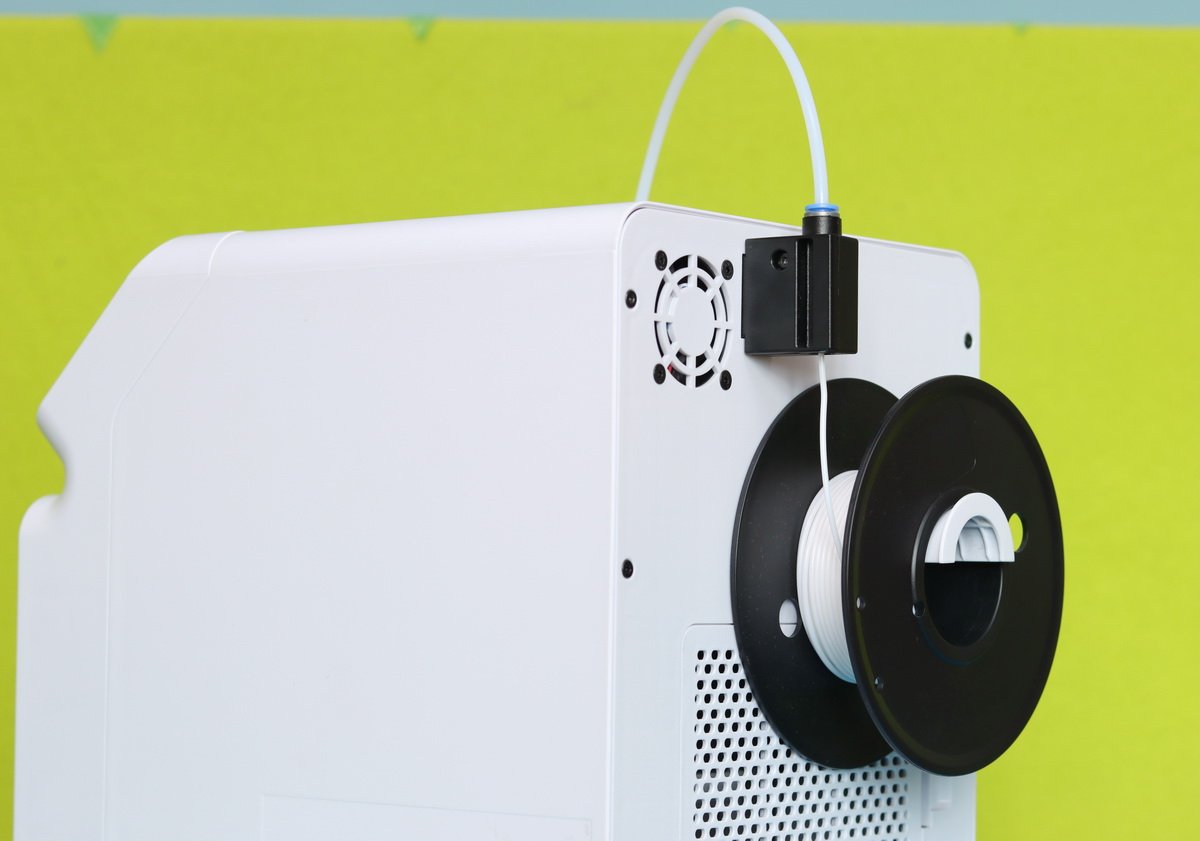
In terms of design, the MiniBox A1 looks like an old-school portable CRT television. The unit measures 312x312x352mm and weighs around 2.5kg. It comes fully assembled. You must attach the filament rack on the back and install the PTFE tube between the print head and filament run-out sensor. Passing the tube through the slot in the top cover is important, as shown in the picture below. The stock spool holder is suitable for 250-gram filaments, but if you plan to use 1KG filament, there is a preloaded g-code filament for printing the compatible holder.

A small drawer collects the purged filament and other residues on the left side. The USB ports (Type-B for PC connection and Type-A for external memory) are opposite. A removable service window is on the back, along with the DC plug and power switch.

The beauty of this kids’ 3D printer is in the front, a large color touch screen display. In addition to the internal LED that illuminates the print model, it has three LEDs around the LCD, which are more for design than to help with anything. The LEDs can be turned ON/OFF from the settings menu.

Under the LCD is the main “door” through which you have access to remove the printed models. The 100x100mm unheated print bed uses a magnetic PEI sheet. It is equipped with a direct drive extruder that allows flexible materials such as TPU to be used. The 0.4mm nozzle’s temperature can be set between 190-250°C.

Protection for tiny fingers
The hot nozzle and fast-moving parts can cause nasty injuries if a curious child tries to put his hands in the device while it works. If the front door is opened, the printer stops as a precaution but not instantly, so it is not 100% “injury-proof.” An audio alarm is also heard if the front flap is opened during printing. After closing the door, the printer continues the job.

Another safety measure is that settings menus can be password protected, limiting access for kids.
With all the safety features, I do not recommend letting your child operate the printer alone. Supervision by an adult is recommended for kids under the age of 14!
Pricing and availability
The MiniBox A1 is a new product; only a few test units were sent out worldwide. It is listed on kidoodle3d.com, but there is no price or possibility to order it. Compared to similar kids’ 3D printers, I expect the price to be between $150 and $200.
Technical Specifications
| Technology | FDM |
| Supported materials | Recommended: PLA/PLA+/SILK PLA Possible: PETG, TPU, ABS |
| Print volume | 100x100x100mm |
| Print head diameter | 0.4mm |
| Layer thickness | 0.1-0.3mm |
| Printing precision | ±0.1mm |
| Max nozzle temperature | 250°C |
| Printing platform | PEI steel sheet |
| Printing speed | Silent mode: 100mm/s Fast mode: 600mm/s |
| Advanced function | Resume printing: Yes Filament detection: Yes Auto-leveling: No need |
| Slicer | Proprietary slicer |
| Printing modes | UP, TF card, or WiFi APP |
| Operating system | Merlin 2.0 |
| Display | 854×480 color TFT touchscreen |
| Dimensions | 312x312x352mm |
| Weight | 2.5kg |
Kidoodle MiniBox A1: Initial setup
After unwrapping, you need to remove all the protective foams from inside the 3D printer; only then can you plug in the 24V AC/DC adapter.
The first screen prompts the user to choose between English and Chinese, and the second performs a self-check of the unit, including testing the heating elements and cooling fans. In the next step, you need to configure the Wi-Fi connectivity. After this, a QR code is prompted on the screen, which allows the Kidoodle mobile app to be downloaded. If you succeed in installing the mobile APP, you need to create an account and add your printer by scanning a second QR code. After these steps, a confirmation PIN will be shown on the printer’s screen.

The next step is to install the PTFE tube between the print head and filament run-out sensor and attach the spool holder on the back. After these easy steps, the Kidoodle A1 is ready to load the filament and print your first model. For me, the machine worked without any additional print-bed leveling.
Slicing program and mobile APP
The MiniBox A1 comes with the Cura Kidoodle Slicer (v1.3.20) program, available for Windows and macOS. Initially, I thought it was an incompatibility problem with my operating system because nothing happened when I started the app. I figured out that it needs to be run in “Administrator” mode in order to work properly (this may be a security issue).

The slicing program, designed with kids in mind, has a simple user interface with few functionalities—you can only set nozzle temperature and layer height, enable supports, scale, duplicate, and rotate the model. When sliced, the app provides a preview of the printing process.
As the mobile app download didn’t work through the QR code, I contacted the manufacturer, and they sent me details on where to find the iOS version on the Apple App Store.

The mobile app gives you remote access to all the controls, just as you would be in front of the 3D machine. You can load g-code models from the library, start printing, change the temperature, and activate/deactivate “High Speed” mode. The Kidoodle3D app allows you to manage multiple 3D printers and record all your children’s prints.
User experience
It took only 10 minutes to unwrap and start my first print job. The 3D machine comes ready to use. The user interface is very simple and easy to understand for school-aged children. There is a live preview of all pre-loaded models, and if they would like to be surprised, they can choose “randomize” mode. Kids can choose from six categories (number, animals, cartoons, traffic, construction, and toys) of nearly one hundred model files ready to print.
My first print, “number 8,” failed due to poor adhesion; this is normal, as the printer bed does not have a heating element. After I used the included paper glue, the problem never happened again.

In idle mode, the machine is generally quiet, but after a few minutes of printing, when the fan works at maximum speed, it becomes very noisy. You can adjust (lower) fan speed “on the fly”, but it is not recommended.
The print quality is decent. The filament residue can be removed with sandpaper and a hairdryer, making the model’s surface smoother.
With the mobile app, you can monitor the machine’s status and prepare the next print. It has dual speed mode if you are in a hurry and want the job done faster.
Resume print after filament runout and power failure.
I was surprised that these two features are available in this toy printer box. To test this feature, I removed the power cord at 32% of the job and plugged it in after a few hours. The machine started, preloaded the last print job, and asked if I wanted to resume. The rest of the job was 68% finished with no problem —there was no layer separation in the resume operation.

Alternatives: Top 5 Best 3D Printers For Kids In 2024
Doing some research, I found only a few 3D printers intended for kids. The most popular is the ToyBox, which has a slightly smaller print volume than the Kidoodle MiniBox A1. On the other hand, the daVinci miniMaker has a larger print volume (15x15x15cm) and a friendly price tag.
| Print volume | Nozzle temperature | Materials | Price | |
| Kidoodle A1 | 10x10x10cm | 250°C | PLA, TPU, PETG | N/A |
| Toybox Labs | 7x8x9cm | 220°C | PLA | $295 |
| AOSEED X-MAKER | 15x15x15cm | 260°C | PLA, ABS | $399 |
| FLASHFORGE Adventurer 3 | 15x15x15cm | 240°C | PLA, ABS | $399 |
| WEEFUN Tina2S | 10x12x10cm | 260°C | PLA, PLA Pro, TPU | $149 |
| XYZPRINTING da Vinci miniMaker | 15x15x15cm | 240°C | PLA | $189 |
You Can Trust Our Reviews!
Since 2014, FirstQuadcopter has reviewed, thoroughly tested, and rated hundreds of products including drones, gimbals, power station, action cameras, and other high-tech gear to help you make better buying decisions.


hey, I just got my kidoodle and gives an error message at startup. any contact detail for warranty complain?
I this truly safe and user-friendly enough for kids to use, and what features should parents look for when choosing a 3D printer for children?
How this compares to the new AOSEED X-MAKER JOY 3? My 7 years old son wants his first 3d printer and I do know which one would be proper for his age.
how can I order it? my son’s birthday is next month and this 3d printer would be a nice gift for him
Can someone sponsor the technical laboratory at a primary school with such 3D printers?
This little 3d printer is awesome!
nice
MSRP price for MiniBOX A1 3D printer is $279.9
Hello!
What’s the price for the Kidoodle MiniBox A1 3d printer? I couldn’t find it on Amazon…
This seems to be a very good beginners 3D printer!